Changing data root directory in rootless Docker
I switched my Linux laptop to rootless Docker recently.
Running as root, by default Docker stores its data in /var/lib/docker. Switching over to rootless
Docker, the equivalent location is now under my home directory.
My laptop is a two-disk setup (see my write up on dual booting Windows 10 and Xubuntu),
with separate LVM volume groups (VGs) for home, var and tmp. The largest usage of
var was due to Docker. With rootless Docker, I still want Docker to use var and not my home
directory for its stuff.
I had set up rootless Docker with systemd, as recommended by
Docker documentation, which also says:
- The data dir is set to
~/.local/share/dockerby default.- The daemon config dir is set to
~/.config/dockerby default.
With systemd, rootless Docker's config file is in ~/.config/systemd/user/docker.service. The
first three lines of the service stanza in that file looks like this:
[Service]
Environment=PATH=<blah blah blah>
ExecStart=/bin/dockerd-rootless.sh
ExecReload=/bin/kill -s HUP $MAINPID
Line 2, ExecStart tells us that rootless Docker is executed by /bin/dockerd-rootless.sh, which,
by naming convention, is a shell script. And, helpfully, the comment block at the top of that file tells
what it does:
#!/bin/sh
# dockerd-rootless.sh executes dockerd in rootless mode.
#
# Usage: dockerd-rootless.sh [DOCKERD_OPTIONS]
So this script, /bin/dockerd-rootless.sh, takes DOCKERD_OPTIONS. And what might those be?
Docker's documentation says:
Usage: dockerd COMMAND

A self-sufficient runtime for containers.

Options:
      ...<options in alphabetical order>...
      --data-root string                      Root directory of persistent Docker state (default "/var/lib/docker")
Aha! Putting it together, the way to set data-root directory for rootless Docker is to modify the
ExecStart key in ~/.config/systemd/user/docker.service, like this:
[Service]
Environment=PATH=<blah blah blah>
ExecStart=/bin/dockerd-rootless.sh --data-root /var/lib/docker-1000
ExecReload=/bin/kill -s HUP $MAINPID
As root, I created /var/lib/docker-1000 and then chown 1000:1000 it, to serve as my rootless Docker setup's data
root directory. Restarted rootless Docker, and it now uses the new data root directory:
% systemctl --user stop docker
% systemctl --user daemon-reload
% systemctl --user start docker
% docker info | egrep "Root Dir"
 Docker Root Dir: /var/lib/docker-1000
Updated Alpine Linux Pharo VM Docker Image
I've updated the [Docker image for pharo.cog.spur.minheadless VM
built on Alpine Linux] (https://hub.docker.com/r/pierceng/pharovm-alpine).
This version is built on Alpine Linux 3.12.
This version removes the following plugins. I'm still thinking about some of the others, especially the GUI-related ones. The idea is of course to have the smallest possible set of plugins. Comments welcome.
- Security
- Drop
- Croquet
- DSAPrims
- JoystickTablet
- MIDI
- Serial
- StarSqueak
- InternetConfig
The output Docker image contains the Pharo VM only and is not runnable by itself. It is intended to be used as a base to build your own Docker image containing your application-specific Pharo image.
I'll be building a similar Docker image for Pharo's fork of the VM.
Tags: Alpine Linux, DockerBuilding Pharo VM on Alpine Linux in Docker
I've put up a
Dockerfile
that builds the Pharo pharo.cog.spur.minheadless VM on Alpine Linux
within Docker. This allows one to build said VM without having to first
create an Alpine Linux installation such as through VirtualBox.
This is a multi-stage Dockerfile. The Pharo VM is built in an Alpine Linux 'build' container. Then the VM files are copied into a fresh Alpine Linux Docker image. The resulting Pharo VM Docker image is ~14 MB.
The output Docker image contains the Pharo VM only and is not runnable by itself. It is intended to be used as a base to build your own Docker image containing your application-specific Pharo image.
Tested on Ubuntu 18.04 and MacOS Mojave.
Edit: Changes to OpenSmalltalk VM source tree for building on Alpine Linux
are in the pierce_alpine branch of my fork.
Minimizing Docker Pharo - Plugins
In the quest^Wrather leisurely ambulation towards the smallest possible Docker image for Pharo for running headless, batch and server-side applications, one approach is to reduce the size of the Pharo VM, by removing irrelevant built-in and external plugins, also known as modules.
Here's what a pharo.cog.spur.minheadless VM built yesterday produces
from STON toStringPretty: Smalltalk vm listBuiltinModules:
'[
	''SqueakFFIPrims'',
	''IA32ABI VMMaker.oscog-eem.2480 (i)'',
	''FilePlugin VMMaker.oscog-eem.2530 (i)'',
	''FileAttributesPlugin FileAttributesPlugin.oscog-eem.50 (i)'',
	''LargeIntegers v2.0 VMMaker.oscog-eem.2530 (i)'',
	''LocalePlugin VMMaker.oscog-eem.2495 (i)'',
	''MiscPrimitivePlugin VMMaker.oscog-eem.2480 (i)'',
	''SecurityPlugin VMMaker.oscog-eem.2480 (i)'',
	''SocketPlugin VMMaker.oscog-eem.2568 (i)'',
	''B2DPlugin VMMaker.oscog-eem.2536 (i)'',
	''BitBltPlugin VMMaker.oscog-nice.2587 (i)'',
	''FloatArrayPlugin VMMaker.oscog-eem.2480 (i)'',
	''FloatMathPlugin VMMaker.oscog-eem.2480 (i)'',
	''Matrix2x3Plugin VMMaker.oscog-eem.2480 (i)'',
	''DropPlugin VMMaker.oscog-eem.2480 (i)'',
	''ZipPlugin VMMaker.oscog-eem.2480 (i)'',
	''ADPCMCodecPlugin VMMaker.oscog-eem.2480 (i)'',
	''AsynchFilePlugin VMMaker.oscog-eem.2493 (i)'',
	''BMPReadWriterPlugin VMMaker.oscog-eem.2480 (i)'',
	''DSAPrims CryptographyPlugins-eem.14 (i)'',
	''FFTPlugin VMMaker.oscog-eem.2480 (i)'',
	''FileCopyPlugin VMMaker.oscog-eem.2493 (i)'',
	''JoystickTabletPlugin VMMaker.oscog-eem.2493 (i)'',
	''MIDIPlugin VMMaker.oscog-eem.2493 (i)'',
	''SerialPlugin VMMaker.oscog-eem.2493 (i)'',
	''SoundCodecPrims VMMaker.oscog-eem.2480 (i)'',
	''SoundGenerationPlugin VMMaker.oscog-eem.2480 (i)'',
	''StarSqueakPlugin VMMaker.oscog-eem.2480 (i)'',
	''Mpeg3Plugin VMMaker.oscog-eem.2495 (i)'',
	''VMProfileLinuxSupportPlugin VMMaker.oscog-eem.2480 (i)'',
	''UnixOSProcessPlugin VMConstruction-Plugins-OSProcessPlugin.oscog-dtl.66 (i)''
]'
And here's the directory listing of the VM as built:
~/src/opensmalltalk-vm/products/ph64mincogspurlinuxht% ls
libAioPlugin.so*             libPharoVMCore.a             libSqueakSSL.so*             libssh2.so@
libCroquetPlugin.so*         libRePlugin.so*              libSurfacePlugin.so*         libssh2.so.1@
libEventsHandlerPlugin.so*   libSDL2-2.0.so.0@            libcrypto.so.1.1*            libssh2.so.1.0.1*
libInternetConfigPlugin.so*  libSDL2-2.0.so.0.7.0*        libgit2.so@                  libssl.so@
libJPEGReadWriter2Plugin.so* libSDL2.so@                  libgit2.so.0.26.8*           libssl.so.1.1*
libJPEGReaderPlugin.so*      libSDL2DisplayPlugin.so*     libgit2.so.26@               pharo*
For server-side applications, a number of the plugins and shared libraries
(certainly also libPharoVMCore.a) need not be part of the Docker image.
Minimizing Docker Pharo
As tweeted: Docker image of Pharo VM, 7.0.3-based app Pharo image, changes/sources files, Ubuntu 16.04, 484MB. With Pharo VM Alpine Docker image, 299MB. Build app Pharo image from minimal, run without changes/sources, Alpine Pharo VM, 83MB!
And here's the Docker container resident set size upon switching from the 484MB Docker image to the Alpine-based Docker image:
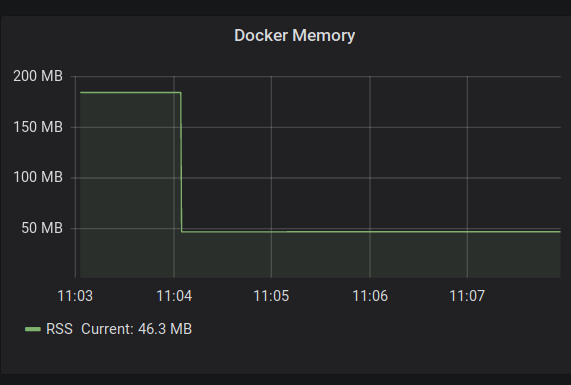
Norbert Hartl and I are collaborating on minimizing Dockerized Pharo. All are welcome to join.
Tags: Alpine Linux, deployment, DockerPoC: Alpine Linux Minimal Stateless Pharo
Alpine Linux is a security-oriented, lightweight distro based on musl-libc and BusyBox. Official Docker images of Alpine Linux are about 5MB each.
I've successfully built the pharo.cog.spur.minheadless OpenSmalltalk VM on Alpine Linux. Dockerizing the Pharo VM files plus a built-from-source libsqlite3.so (without Pharo image/changes/etc) produces a Docker image weighing in at 12.5MB.
% sudo docker images | egrep "samadhiweb.*alpine"
samadhiweb/pharo7vm                    alpine              299420ff0e03        21 minutes ago      12.5MB
Pharo provides minimal images that contain basic Pharo packages without the integrated GUI, useful for building server-side applications.
From the Pharo 7.0.3 minimal image, I've built a "stateless" image containing FFI, Fuel, and UDBC-SQLite. "Stateless" means the image can be executed by the Pharo VM without the changes and sources files. Here are the sizes of the base minimal image and my SQLite image:
% ls -l udbcsqlite.image Pharo7.0.3-0-metacello-64bit-0903ade.image
-rw-rw-r-- 1 pierce pierce 13863032 Apr 12 22:56 Pharo7.0.3-0-metacello-64bit-0903ade.image
-rw-rw-r-- 3 pierce pierce 17140552 Jul 20 14:11 udbcsqlite.image
Below, I run the image statelessly on my Ubuntu laptop. Note that this uses the regular Pharo VM, not the Alpine Linux one.
% mkdir stateless
% cd stateless
% ln ../udbcsqlite.image
% chmod 444 udbcsqlite.image
% cat > runtests.sh <<EOF
#!/bin/sh
~/pkg/pharo7vm/gofaro -vm-display-none udbcsqlite.image test --junit-xml-output "UDBC-Tests-SQLite-Base"
EOF
% chmod a+x runtests.sh
% ls -l
total 16744
-rwxr-xr-x 1 pierce pierce      116 Jul 20 15:25 runtests.sh*
-r--r--r-- 3 pierce pierce 17140552 Jul 20 14:11 udbcsqlite.image
%
%
% ./runtests.sh
Running tests in 1 Packages
71 run, 71 passes, 0 failures, 0 errors.
% ls -l
total 16764
-rw-r--r-- 1 pierce pierce     6360 Jul 20 15:26 progress.log
-rwxr-xr-x 1 pierce pierce      116 Jul 20 15:25 runtests.sh*
-r--r--r-- 3 pierce pierce 17140552 Jul 20 14:11 udbcsqlite.image
-rw-r--r-- 1 pierce pierce    11072 Jul 20 15:26 UDBC-Tests-SQLite-Base-Test.xml
Dockerizing udbcsqlite.image together with the aforementioned Alpine
Linux Pharo VM produces a Docker image that is 46.8 MB in size.
% sudo docker images | egrep "samadhiweb.*alpine"
samadhiweb/p7minsqlite                 alpine              3a57853099d0        44 minutes ago      46.8MB
samadhiweb/pharo7vm                    alpine              299420ff0e03        About an hour ago   12.5MB
Run the Docker image:
% sudo docker run --ulimit rtprio=2 samadhiweb/p7minsqlite:alpine
Running tests in 1 Packages
71 run, 71 passes, 0 failures, 0 errors.
For comparison and contrast, here are the sizes of the regular Pharo 7.0.3 image, changes and sources files:
% ls -l Pharo7.0*-0903ade.*
-rw-rw-r-- 1 pierce pierce      190 Apr 12 22:57 Pharo7.0.3-0-64bit-0903ade.changes
-rw-rw-r-- 1 pierce pierce 52455648 Apr 12 22:57 Pharo7.0.3-0-64bit-0903ade.image
-rw-rw-r-- 2 pierce pierce 34333231 Apr 12 22:55 Pharo7.0-32bit-0903ade.sources
Telemon: Pharo metrics for Telegraf
In my previous post on the TIG monitoring stack, I mentioned that Telegraf supports a large number of input plugins. One of these is the generic HTTP plugin that collects from one or more HTTP(S) endpoints producing metrics in supported input data formats.
I've implemented Telemon, a Pharo package that allows producing Pharo VM and application-specific metrics compatible with the Telegraf HTTP input plugin.
Telemon works as a Zinc ZnServer delegate. It produces metrics in the
InfluxDB line protocol format.
By default, Telemon produces the metrics generated by
VirtualMachine>>statisticsReport and its output looks like this:
TmMetricsDelegate new renderInfluxDB
"pharo uptime=1452854,oldSpace=155813664,youngSpace=2395408,memory=164765696,memoryFree=160273136,fullGCs=3,fullGCTime=477,incrGCs=9585,incrGCTime=9656,tenureCount=610024"
As per the InfluxDB line protocol, 'pharo' is the name of the measurement, and the items in key-value format form the field set.
To add a tag to the measurement:
| tm |
tm := TmMetricsDelegate new.
tm tags at: 'host' put: 'telemon-1'.
tm renderInfluxDB
"pharo,host=telemon-1 uptime=2023314,oldSpace=139036448,youngSpace=5649200,memory=147988480,memoryFree=140242128,fullGCs=4,fullGCTime=660,incrGCs=14291,incrGCTime=12899,tenureCount=696589"
Above, the tag set consists of "host=telemon-1".
Here's another invocation that adds two user-specified metrics but no tag.
| tm |
tm := TmMetricsDelegate new.
tm fields
  at: 'meaning' put: [ 42 ];
  at: 'newMeaning' put: [ 84 ].
tm	renderInfluxDB
"pharo uptime=2548014,oldSpace=139036448,youngSpace=3651736,memory=147988480,memoryFree=142239592,fullGCs=4,fullGCTime=660,incrGCs=18503,incrGCTime=16632,tenureCount=747211,meaning=42,newMeaning=84"
Note that the field values are Smalltalk blocks that will be evaluated dynamically.
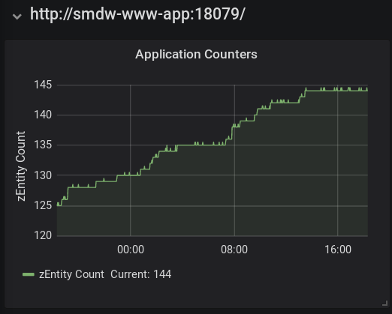
When I was reading the specifications for Telegraf's plugins, the InfluxDB line protocol, etc., it all felt rather dry. I imagine this short post is the same so far for the reader who isn't familiar with how the TIG components work together. So here are teaser screenshots of the Grafana panels for the Pharo VM and blog-specific metrics for this blog, which I will write about in the next post.
This Grafana panel shows a blog-specific metric named 'zEntity Count'.
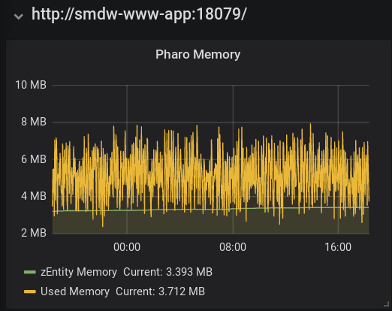
This next panel shows the blog-specific metric 'zEntity Memory' together with the VM metric 'Used Memory' which is the difference between the 'memory' and 'memoryFree' fields.
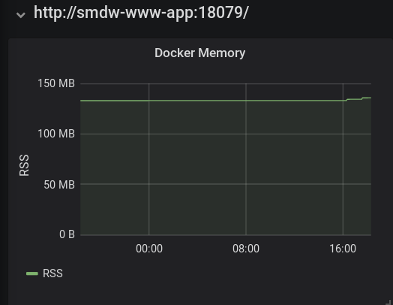
This blog runs in a Docker container. The final panel below shows the resident set size (RSS) of the container as reported by the Docker engine.
TIG: Telegraf InfluxDB Grafana Monitoring
I've set up the open source TIG stack to monitor the services running on these servers. TIG = Telegraf + InfluxDB + Grafana.
-
Telegraf is a server agent for collecting and reporting metrics. It comes with a large number of input, processing and output plugins. Telegraf has built-in support for Docker.
-
InfluxDB is a time series database.
-
Grafana is a feature-rich metrics dashboard supporting a variety of backends including InfluxDB.
Each of the above runs in a Docker container. Architecturally, Telegraf stores the metrics data that it collects into InfluxDB. Grafana generates visualizations from the data that it reads from InfluxDB.
Here are the CPU and memory visualizations for this blog, running on Pharo 7 within a Docker container. The data is as collected by Telegraf via querying the host's Docker engine.
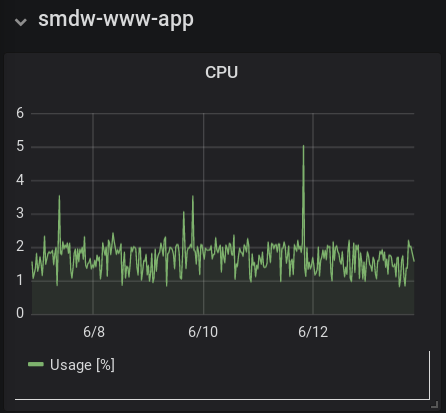
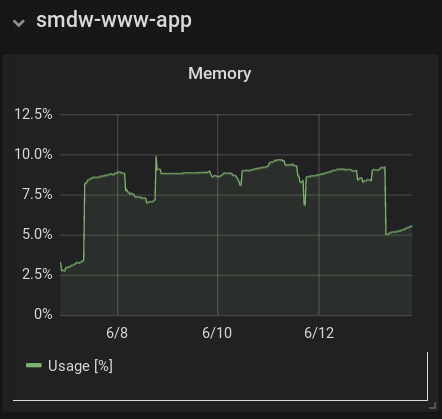
Following comes to mind:
-
While Pharo is running on the server, historically I've kept its GUI running via RFBServer. I haven't had to VNC in for a long time now though. Running Pharo in true headless mode may reduce Pharo's CPU usage.
-
In terms of memory, ~10% usage by a single application is a lot on a small server. Currently this blog stores everything in memory once loaded/rendered. But with the blog's low volume, there really isn't a need to cache; all items can be read from disk and rendered on demand.
Only one way to find out - modify software, collect data, review.
Tags: DevOps, DockerThis blog now on HTTPS
This blog is now on HTTPS.
Setup:
- Caddy as web reverse proxy.
- SmallCMS1, the blog engine, runs on Pharo 6.
- Blog content is held in a Fossil repository with a running Fossil server to support content pushing.
- Each component runs in a Docker container.
Caddy is an open source HTTP/2 web server. caddy-docker-proxy is a plugin for Caddy enabling Docker integration - when an appropriately configured Docker container or service is brought up, caddy-docker-proxy generates a Caddy site specification entry for it and reloads Caddy. With Caddy's built-in Let's Encrypt functionality, this allows the new container/service to run over HTTPS seamlessly.
Below is my docker-compose.yml for Caddy. I built Caddy with the caddy-docker-proxy plugin from source and named the resulting Docker image samadhiweb/caddy. The Docker network caddynet is the private network for Caddy and the services it is proxying. The Docker volume caddy-data is for persistence of data such as cryptographic keys and certificates.
version: '3.6'

services:

  caddy:
    image: samadhiweb/caddy
    command: -agree -docker-caddyfile-path=/pkg/caddy/caddyfile -log=/var/log/caddy/caddy.log
    ports:
      - "80:80"
      - "443:443"
    networks:
      - caddynet
    volumes:
      - type: bind
        source: /var/run/docker.sock
        target: /var/run/docker.sock
      - type: bind
        source: /pkg/caddy
        target: /pkg/caddy
      - type: volume
        source: caddy-data
        target: /root/.caddy
      - type: bind
        source: /var/log/caddy
        target: /var/log/caddy
    restart: unless-stopped

networks:
  caddynet:
    name: caddynet
    external: true

volumes:
  caddy-data:
    name: caddy-data
    external: true
Here's the docker-compose.yml snippet for the blog engine:
services:
  scms1app:
    image: samadhiweb/scms1app
    ports:
      - "8081:8081"
    networks:
      - caddynet
    volumes:
      - type: bind
        source: /pkg/smallcms1/config.json
        target: /etc/smallcms1/config.json
      - type: volume
        source: smdw-content
        target: /pkg/cms
    labels:
      - "caddy.address=www.samadhiweb.com"
      - "caddy.targetport=8081"
      - "caddy.targetprotocol=http"
      - "caddy.proxy.header_upstream_1=Host www.samadhiweb.com"
      - "caddy.proxy.header_upstream_2=X-Real-IP {remote}"
      - "caddy.proxy.header_upstream_3=X-Forwarded-For {remote}"
      - "caddy.tls=email-address@samadhiweb.com"
      - "caddy.log=/var/log/caddy/www.samadhiweb.com.access.log"
    ulimits:
      rtprio:
        soft: 2
        hard: 2
    restart: unless-stopped

networks:
  caddynet:
    name: caddynet
    external: true

volumes:
  smdw-content:
    name: smdw-content
    external: true
Of interest are the caddy.* labels from which caddy-docker-proxy generates the following in-memory Caddy site entry:
www.samadhiweb.com {
  log /var/log/caddy/www.samadhiweb.com.access.log
  proxy / http://<private-docker-ip>:8081 {
    header_upstream Host www.samadhiweb.com
    header_upstream X-Real-IP {remote}
    header_upstream X-Forwarded-For {remote}
  }
  tls email-address@samadhiweb.com
}
Also note the ulimits section, which sets the suggested limits for the Pharo VM heartbeat thread. These limits must be set in the docker-compose file or on the docker command line - copying a prepared file into /etc/security/limits.d/pharo.conf does not work when run in a Docker container.
    ulimits:
      rtprio:
        soft: 2
        hard: 2
Docker and Pharo
Recently there were discussions and blog posts on Docker for Pharo and Gemstone/S. This is my report after spending an afternoon on the subject.
First, some links:
This blog is implemented in Pharo and is the natural choice for my Docker example application. I already have a Smalltalk snippet to load this blog's code and its dependencies into a pristine Pharo image, so I'll be using that. Also, as a matter of course, I build the Pharo VM from source, and my VM installation also contains self-built shared libraries like libsqlite.so and libshacrypt.so.
Outside of Docker, prepare a custom Pharo image:
% cp ../Pharo64-60543.image scms1.image
% cp ../Pharo64-60543.image scms1.image
% ~/pkg/pharo6vm64/gofaro scms1.image st loadSCMS1.st
gofaro is a simple shell script which purpose is to make sure the Pharo VM loads my custom shared libraries, co-located with the standard VM files, at run time:
#!/bin/sh
PHAROVMPATH=$(dirname `readlink -f "$0"`)
LD_LIBRARY_PATH="$PHAROVMPATH" exec "$PHAROVMPATH/pharo" $@
loadSCMS1.st looks like this:
"Load dependencies and then the blog code."
Gofer it ...
Gofer it ...
Metacello new ...
Metacello new ...

"Save the image for injection into Docker."
SmalltalkImage current snapshot: true andQuit: true
Before describing my Dockerfile, here are my conventions for inside the Docker container:
- VM goes into /pkg/vm.
- Application artifacts including the image and changes files go into /pkg/image.
- For this blog application, the blog's content is in /pkg/cms.
Starting with Ubuntu 18.04, install libfreetype6. The other lines are copied from Torsten's tutorial.
FROM ubuntu:18.04
LABEL maintainer="Pierce Ng"
RUN apt-get update \
  && apt-get -y install libfreetype6 \
  && apt-get -y upgrade \
  && rm -rf /var/lib/apt/lists/* \
  && true
Next, install the Pharo VM.
RUN mkdir -p /pkg/vm
COPY pharo6vm64/ /pkg/vm
COPY pharolimits.conf /etc/security/limits.d/pharo.conf
Now copy over the prepared Pharo image.
RUN mkdir -p /pkg/image
WORKDIR /pkg/image
COPY PharoV60.sources PharoV60.sources
COPY scms1.image scms1.image
COPY scms1.changes scms1.changes
COPY runSCMS1.st runSCMS1.st
Finally, set the Docker container running. Here we create a UID/GID pair to run the application. Said UID owns the mutable Pharo files in /pkg/image and also the /pkg/image directory itself, in case the application needs to create other files such as SQLite databases.
RUN groupadd -g 1099 pharoapp && useradd -r -u 1099 -g pharoapp pharoapp
RUN chown -R pharoapp:pharoapp /pkg/image
RUN chown root:root /pkg/image/PharoV60.sources
RUN chown root:root /pkg/image/runSCMS1.st
EXPOSE 8081
USER pharoapp:pharoapp
CMD /pkg/vm/gofaro -vm-display-null -vm-sound-null scms1.image --no-quit st runSCMS1.st
runSCMS1.st runs the blog application. In my current non-Dockerized installation, the runSCMS1.st-equivalent snippet is in a workspace; for Docker, to become DevOps/agile/CI/CD buzzwords-compliant, this snippet is run from the command line. This is one Dockerization adaptation I had to make to my application.
Now we build the Docker image.
% sudo docker build -t samadhiweb/scms1:monolithic .
Sending build context to Docker daemon    299MB
Step 1/19 : FROM ubuntu:18.04
 ---> cd6d8154f1e1
Step 2/19 : LABEL maintainer="Pierce Ng"
 ---> Using cache
 ---> 1defb3ac00a8
Step 3/19 : RUN apt-get update   && apt-get -y install libfreetype6   && apt-get -y upgrade   && rm -rf /var/lib/apt/lists/*   && true
 ---> Running in b4e328138b50
<bunch of apt-get output>
Removing intermediate container b4e328138b50
 ---> 79e9d8ed7959
Step 4/19 : RUN mkdir -p /pkg/vm
 ---> Running in efb2b9b717fe
Removing intermediate container efb2b9b717fe
 ---> 0526cbc4c483
Step 5/19 : COPY pharo6vm64/ /pkg/vm
 ---> 2d751994c68c
Step 6/19 : COPY pharolimits.conf /etc/security/limits.d/pharo.conf
 ---> f442f475c568
Step 7/19 : RUN mkdir -p /pkg/image
 ---> Running in 143ebd54f243
Removing intermediate container 143ebd54f243
 ---> 6d1b99d30050
Step 8/19 : WORKDIR /pkg/image
 ---> Running in 45c76d8c08c0
Removing intermediate container 45c76d8c08c0
 ---> 57247408801b
Step 9/19 : COPY PharoV60.sources PharoV60.sources
 ---> 8802acc416f0
Step 10/19 : COPY scms1.image scms1.image
 ---> 3e2d62be5d00
Step 11/19 : COPY scms1.changes scms1.changes
 ---> dcbec7ebdda9
Step 12/19 : COPY runSCMS1.st runSCMS1.st
 ---> 72fa4efb33ff
Step 13/19 : RUN groupadd -g 1099 pharoapp && useradd -r -u 1099 -g pharoapp pharoapp
 ---> Running in e0af716c8db2
Removing intermediate container e0af716c8db2
 ---> 0a42beed8065
Step 14/19 : RUN chown -R pharoapp:pharoapp /pkg/image
 ---> Running in 2da21fefa399
Removing intermediate container 2da21fefa399
 ---> 0d808f48ae32
Step 15/19 : RUN chown root:root /pkg/image/PharoV60.sources
 ---> Running in 4ca0c6eb8301
Removing intermediate container 4ca0c6eb8301
 ---> 1426236b509c
Step 16/19 : RUN chown root:root /pkg/image/runSCMS1.st
 ---> Running in a942ecb8a155
Removing intermediate container a942ecb8a155
 ---> 1213e1647076
Step 17/19 : EXPOSE 8081
 ---> Running in 3b74e55b6394
Removing intermediate container 3b74e55b6394
 ---> a04593571d13
Step 18/19 : USER pharoapp:pharoapp
 ---> Running in 77ecde5a7ca7
Removing intermediate container 77ecde5a7ca7
 ---> 975b614d3a9f
Step 19/19 : CMD /pkg/vm/gofaro -vm-display-null -vm-sound-null scms1.image --no-quit st runSCMS1.st
 ---> Running in 2c6e7645da3d
Removing intermediate container 2c6e7645da3d
 ---> 65b4ca6cc5c5
Successfully built 65b4ca6cc5c5
Successfully tagged samadhiweb/scms1:monolithic
% sudo docker image ls
REPOSITORY              TAG                 IMAGE ID            CREATED             SIZE
samadhiweb/scms1        monolithic          65b4ca6cc5c5        2 minutes ago       402MB
...
%
The Docker image has been created, but it is not ready to run yet, because the web content is not in the image. I'll put the content in a Docker volume. Below, the first -v mounts my host's content directory into /tmp/webcontent in the container; the second -v mounts the volume smdw-content into /pkg/cms in the container; I'm running the busybox image to get a shell prompt; and within the container I copy the web content from the source to the destination.
% sudo docker volume create smdw-content
% sudo docker run --rm -it \
  -v ~/work/webcms/samadhiweb:/tmp/webcontent \
  -v smdw-content:/pkg/cms \
  busybox sh
/ # cp -p -r /tmp/webcontent/* /pkg/cms/
/ # ^D
%
Finally, run the Docker image, taking care to mount the volume smdw-content, now with this blog's content:
% sudo docker run --rm -d -p 8081:8081 \
  -v smdw-content:/pkg/cms \
  --name samadhiweb samadhiweb/scms1:monolithic
bfcc80b32f35b3979c5c8c1b28bd3464f79ebdae91f51d9422334b209678ab5c
% sudo docker ps
CONTAINER ID        IMAGE                         COMMAND                  CREATED             STATUS              PORTS                    NAMES
bfcc80b32f35        samadhiweb/scms1:monolithic   "/bin/sh -c '/pkg/vm."   4 seconds ago       Up 3 seconds        0.0.0.0:8081->8081/tcp   samadhiweb
Verified with a web browser. This works on my computer. :-)
Tags: deployment, Docker